Floral Butter Cookies with Royal Icing
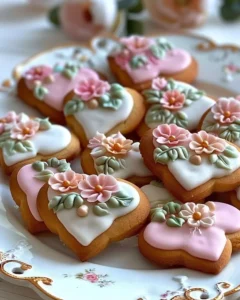
Delight in the whimsical world of Floral Butter Cookies with Royal Icing, where each bite dances on your tongue, offering a delightful crunch followed by a melt-in-your-mouth buttery softness. This recipe paints a canvas of sweet artistry that will have your kitchen enveloped in the enticing aromas of freshly baked cookies, mingling with the sweet scent of vanilla and buttery goodness. These cookies are not just treats; they are tiny sculptures, bringing joy and warmth to any occasion. Follow this step-by-step guide to create a batch of these enchanting cookies that will not only tantalize your taste buds but also brighten your day!
The origins of butter cookies can be traced back centuries, with various cultures claiming their version of these beloved treats. Traditionally, butter cookies were thought to have originated in Northern Europe, where they became a staple in festive celebrations. As time marched on, these delightful confections found their way into many countries, taking on unique variations and character along the way. The royal icing technique, often associated with decorated sugar cookies, has roots in England, where it was used to create intricate designs that transformed simple cookies into works of art. Today, we’re merging these rich traditions to create Floral Butter Cookies that are as beautiful as they are delicious.
To craft these stunning Floral Butter Cookies with Royal Icing, you will need the following ingredients. Each element contributes to a beautifully balanced flavor and an inviting texture that is sure to impress. Gather together 2 1/4 cups of all-purpose flour, which forms the structure, offering a tender crunch with each bite. Combine this with 1/2 cup of powdered sugar, adding just the right sweetness that blends beautifully with 1 cup of softened unsalted butter, making the dough luxuriously creamy.
A splash of vanilla extract, about one teaspoon, provides a fragrant aroma, while 1/4 teaspoon of almond extract (optional) enhances the complex flavors of your cookies. A pinch of 1/4 teaspoon salt counters the sweetness perfectly, elevating the overall taste. For the royal icing, you’ll need either one egg white or three tablespoons of meringue powder, whisked into a frothy consistency. Add in 1 3/4 cups of powdered sugar for sweetness and a touch of 1/2 teaspoon lemon juice to brighten the flavor. Finally, don’t forget your gel food colors—think pink, purple, green, and yellow—ready to transform your cookies into a floral masterpiece.
Creating these cookies can be approached in two ways: quick or slow preparation. Quick preparation means gathering all your ingredients and diving straight into the mixing process after a brief preheating of your oven. This approach works well when time is of the essence, perfect for unexpected visitors or a last-minute dessert request. In contrast, slow preparation allows you to savor the experience, taking your time with each step, possibly even allowing the dough to chill to enhance flavors and make rolling easier. Whichever method you choose, always preheat your oven to a precise 350°F (175°C) and line your baking sheet with parchment paper for easy cleanup.
Let’s embark on this delightful journey together with step-by-step instructions! First, preheat your oven to 350°F (175°C) and line a baking sheet with parchment paper—a crucial step to ensure your cookies do not stick. In a large mixing bowl, cream together your softened butter and powdered sugar until the mixture is light, fluffy, and irresistible. The process itself is therapeutic, and as you mix, the fragrance of the ensconcing vanilla fills the air, promising sweet rewards ahead.
Next, add in your one teaspoon of vanilla extract, your optional almond extract, and the pinch of salt. These ingredients meld so beautifully they almost become a cozy hug for your taste buds. Mix them in until completely combined, enjoying the luxurious texture that forms. Gradually introduce the all-purpose flour, one-quarter cup at a time, stirring gently until your dough comes together in a soft, pliable ball.
Once your dough is formed, roll it out on a lightly floured surface until it’s about 1/4 inch thick. The light dusting of flour will ensure it doesn’t stick, setting a lovely scene as you cut out flower shapes using your favorite cookie cutter. Each cut-out petal will evoke a sense of creativity, as you transfer them lovingly onto your prepared baking sheet. Bake the cookies for 8-10 minutes, or until the edges just begin to turn golden, and let the cookies cool completely on a wire rack, filling your kitchen with delicious scents of anticipation.
Now it’s time for the pièce de résistance—royal icing. In a clean bowl, whisk your egg white or meringue powder with the lemon juice until the mixture turns frothy. Gradually add in your powdered sugar, mixing until smooth and you’ve achieved stiff peaks. The end result should be shiny and ready for decoration! If needed, adjust with a few drops of water to achieve your desired consistency.
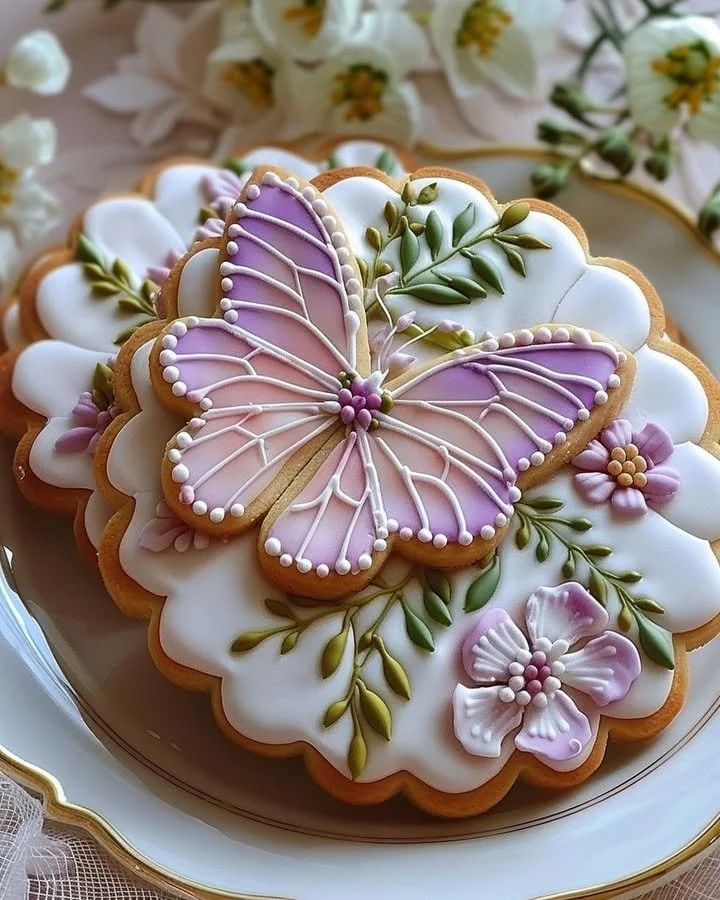
Divide the icing into bowls, and add your gel food colors to unleash a symphony of vibrant shades. Using piping bags or a small spoon, you are now ready to turn your cookies into blooming works of art. Start by outlining the floral shapes and then fill them in with colors of your choice. Each stroke invites creativity, making your cookies uniquely yours. Allow the decorated cookies to dry completely for at least 2-3 hours before serving or storing them, ensuring your icing sets perfectly.
These Floral Butter Cookies are perfect for a variety of occasions—birthday parties, bridal showers, or simply as a sweet treat during afternoon tea. Pair them with a lovely herbal tea or serve them at a tea party where their delicate flavors can shine. Their delightful appearance will surely be the center of attention, sparking conversations and smiles.
While baking them, common mistakes can be easily avoided. One prevalent issue is overbaking the cookies—they should be soft yet firm enough to hold their shape. If you accidentally overbake them, no worries; they’ll still taste delightful! Ensure your butter is truly softened before creaming it with the sugar, for that airy texture is vital. Lastly, if your royal icing is too thick, remember, a few drops of water can do wonders!
For those seeking healthier alternatives, there are ways to make subtle changes without sacrificing flavor. Consider substituting half of the all-purpose flour with whole wheat flour or oat flour to increase fiber content. You can try using coconut sugar in place of powdered sugar for a less refined sweetener option. Moreover, you could decorate with fresh fruits or edible flowers instead of icing for a fresh twist that delights the eyes and palate.
FAQs:
Can I use margarine instead of butter?
- While margarine can be used, butter offers a richer flavor and texture that is essential for this recipe.
How do I store the finished cookies?
- Store the cookies in an airtight container at room temperature for up to one week.
Can I freeze the cookies before decorating?
- Yes! You can freeze the baked cookies for up to three months; just be sure to cool them completely before wrapping.
Is royal icing safe to eat?
- Yes! When made with meringue powder, it is considered safe; you can also make it using a powdered sugar and egg white mix.
How can I make my cookies extra festive?
- Consider adding sprinkles or edible glitter on top of the royal icing for an extra festive touch!
Can I make these cookies gluten-free?
- Yes! Substituting the all-purpose flour with a gluten-free flour blend works well in this recipe.
Each bite of these Floral Butter Cookies with Royal Icing introduces a moment of joy as you sink your teeth into their buttery goodness, adorned with vibrant color. Their delicate floral shapes and soft yet slightly crisp textures create an irresistible harmony, making them a delightful addition to your cookie repertoire. Do not hesitate—try this recipe today! Your kitchen awaits with the promise of aromatic delight and artistic expression, ready to share these beautiful cookies with friends and family. Indulge in the experience of baking, and let each cookie embody the warmth of your own unique touch. Happy baking!
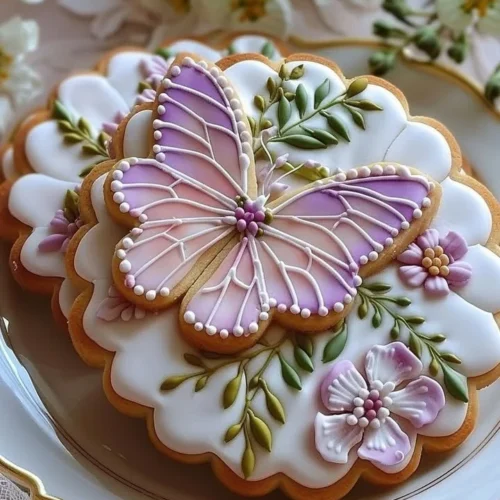
Floral Butter Cookies with Royal Icing
Ingredients
For the cookie dough
- 2 1/4 cups all-purpose flour Forms the structure, offering tender crunch.
- 1/2 cup powdered sugar Adds sweetness.
- 1 cup softened unsalted butter Creates a luxuriously creamy dough.
- 1 teaspoon vanilla extract Provides fragrant aroma.
- 1/4 teaspoon almond extract Optional, enhances flavor.
- 1/4 teaspoon salt Counters sweetness.
For the royal icing
- 1 number egg white Or use 3 tablespoons of meringue powder.
- 1 3/4 cups powdered sugar Adds sweetness.
- 1/2 teaspoon lemon juice Brightens flavor.
- as needed drops water To adjust icing consistency.
- as needed varies gel food colors Use various colors for decoration.
Instructions
Preparation
- Preheat your oven to 350°F (175°C) and line a baking sheet with parchment paper.
- In a large mixing bowl, cream together softened butter and powdered sugar until light and fluffy.
- Add the vanilla extract, optional almond extract, and salt; mix until combined.
- Gradually add all-purpose flour, one-quarter cup at a time, stirring until a soft dough forms.
- Roll out the dough on a lightly floured surface to about 1/4 inch thick and cut into flower shapes.
- Transfer cutouts to the baking sheet and bake for 8-10 minutes until edges are golden.
- Cool cookies completely on a wire rack.
Royal Icing
- In a clean bowl, whisk egg white or meringue powder with lemon juice until frothy.
- Gradually add powdered sugar, mixing until smooth with stiff peaks.
- Divide icing into bowls and add gel food colors. Decorate cookies with outlined shapes and filled colors.
- Allow decorated cookies to dry completely for at least 2-3 hours before serving or storing.