Banana Pudding Cheesecake Cones
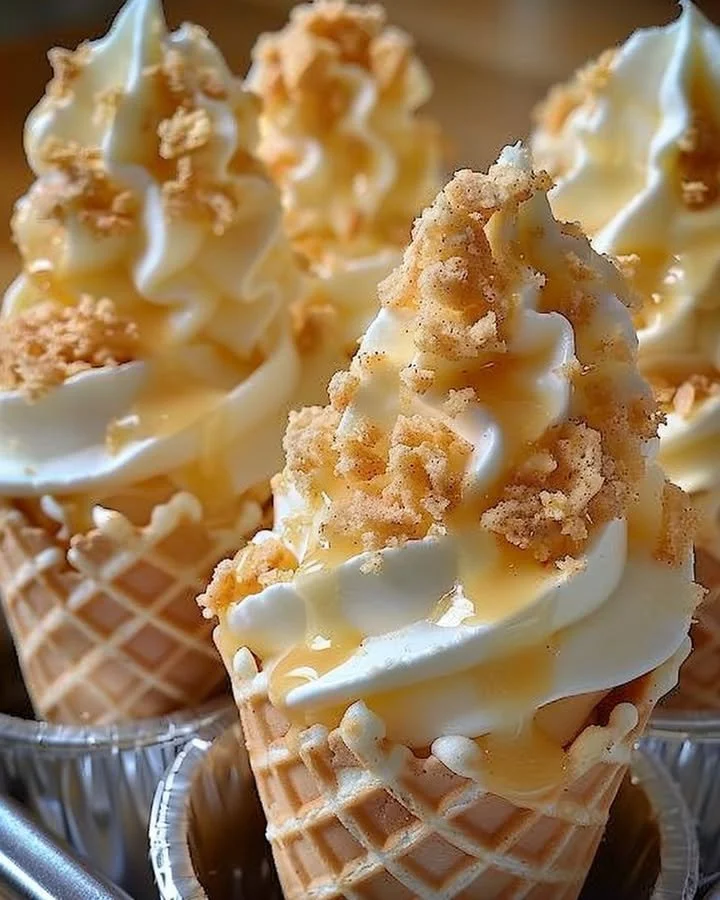
Banana Pudding Cheesecake Cones are the perfect sweet treat that brings together the rich, creamy goodness of cheesecake and the nostalgic flavors of classic banana pudding. Imagine crunching through a crispy waffle cone, only to find layers of luscious cheesecake filling interspersed with slices of ripe banana and crumbles of vanilla wafers. Each bite is a delightful explosion of flavors and textures, making these cones an irresistible dessert option. You will not only be satisfied, but you’ll also feel a gentle wave of happiness wash over you, as good desserts often do. This recipe is worth making for any occasion, whether it’s a sunny picnic, a family gathering, or simply a sweet indulgence at home. Plus, the step-by-step instructions make it easy for anyone to whip up a batch!
Why You’ll Love This Recipe
One of the things that makes Banana Pudding Cheesecake Cones stand out is the simple preparation. With minimal ingredients and just a few quick steps, you’ll be surprised at how effortlessly you can create this delightful treat. It’s family-friendly, making it a perfect activity to involve the kids in; they will love layering the cones and choosing their favorite toppings. This recipe strikes a wonderful balance between traditional flavors and modern presentation, elevating a classic dessert into a fun treat. These cones are also an eye-catching dessert that doubles as a conversation starter!
Ingredients for Banana Pudding Cheesecake Cones
To make your Banana Pudding Cheesecake Cones, gather the following ingredients:
- 6 waffle cones – crispy and strong enough to hold all the delicious filling.
- 1 (8 oz) block cream cheese, softened – this will serve as the rich, creamy base of your cheesecake.
- 1/2 cup sweetened condensed milk – adds a luscious sweetness that complements the cheesiness wonderfully.
- 1 (3.4 oz) box instant banana cream pudding mix – brings in pure banana flavor without hassle.
- 1 1⁄2 cups cold milk – to achieve that perfect creamy consistency.
- 1 tsp vanilla extract – for an aroma that elevates the flavor profile.
- 1 cup whipped topping (like Cool Whip) – for a light and fluffy finish.
- 1/2 cup crushed vanilla wafers – provides a delightful crunch contrasting the creamy filling.
- 1 large banana, sliced – fresh and sweet, adding a bright burst to each bite.
- Extra whipped topping & wafers for garnish – to make your presentation pop!
Step-by-Step Directions for Banana Pudding Cheesecake Cones
Creating your Banana Pudding Cheesecake Cones is simple with these easy-to-follow steps.
Begin by taking a large bowl and beating the softened cream cheese until it’s smooth and creamy. This forms the base of your cheesecake filling.
Add in the sweetened condensed milk, banana pudding mix, cold milk, and vanilla extract. Whip the mixture until it becomes thick and fully combined, ensuring all flavors blend perfectly.
Once your base is ready, gently fold in the whipped topping. This will lighten the mixture, making it airy and fluffy.
Now, it’s time to assemble the cones! Start by layering some crushed vanilla wafers at the bottom of each waffle cone. This gives you that satisfying crunch when you take your first bite.
Follow with a generous spoonful of the cheesecake filling, then add a slice or two of banana. Repeat the layering until the cones are full, alternating between wafers, cheesecake, and banana slices.
For the finishing touch, top each cone with extra whipped topping, sprinkle with more crushed wafers, and adorn with a banana slice or wafer for garnish.
Chill your cones upright for at least 30 minutes before serving. This helps set the filling and enhances the overall texture.
Tips & Tricks
Before diving into your Banana Pudding Cheesecake Cones, here are a few tips that can elevate your dessert experience:
- For an extra touch of flavor, consider adding a pinch of cinnamon to the cheesecake filling, which pairs wonderfully with banana.
- If you’d like a stronger banana flavor, try mashing half a banana and mixing it in with the cheesecake filling.
- Consider using chocolate whipped topping or drizzling chocolate sauce over the cones for a decadent twist.
- Keep your cones standing upright in a muffin tin while chilling to maintain their shape and order.
- Feel free to personalize your cones with additional toppings, such as caramel sauce or chopped nuts.
Serving Suggestions & Pairings
Banana Pudding Cheesecake Cones can be served in a variety of delightful ways. You might consider setting up a dessert bar with a selection of toppings, like chocolate chips, sprinkles, or additional fruit options. Pair with a refreshing glass of iced tea or lemonade for a light summer treat, or serve alongside a rich coffee for a cozy dessert option. For a real indulgence, why not serve them with a scoop of vanilla ice cream on the side? The combinations are endless!
Nutritional Information
Each Banana Pudding Cheesecake Cone is a delightful indulgence. While the exact nutritional content may vary based on the specific ingredients used, on average, each cone will provide roughly:
- Calories: Approximately 300-350
- Fat: 18g
- Carbohydrates: 40g
- Protein: 3g
These cones are a fun dessert meant for occasional indulgence, perfect for satisfying your sweet tooth!
Storing Tips & Variations for Banana Pudding Cheesecake Cones
If you have leftovers, you can store them in the refrigerator for up to 2 days. However, for the best texture, it’s ideal to enjoy them fresh. If you want to prepare components in advance, you can make the cheesecake filling and store it in an airtight container in the fridge. Just be sure to layer the cones right before serving to maintain their crunch. For healthier swaps, consider using Greek yogurt in place of cream cheese, or opt for sugar-free pudding mix.
Conclusion for Banana Pudding Cheesecake Cones
Now that you know how to make these fantastic Banana Pudding Cheesecake Cones, it’s time to get started! The delightful combination of flavors and textures will surely please everyone, making them a hit for any gathering. Don’t hesitate to dive into this recipe and experience the joy that these cones bring!
FAQs
Can I use a different type of pudding mix?
Yes, you can experiment with different flavors like vanilla or chocolate for a unique twist.Are these cones suitable for making in advance?
You can prepare the filling ahead of time, but it’s best to assemble the cones fresh to keep them crunchy.Can I substitute the cream cheese?
For a lighter option, you can replace cream cheese with Greek yogurt or use a vegan cream cheese alternative.What’s the best way to serve these cones?
For an attractive presentation, arrange the cones upright in a tall glass or muffin tin.Could I turn this into a larger dessert?
Absolutely! You can layer the ingredients in a trifle dish for a gorgeous banana pudding cheesecake masterpiece, served family-style!
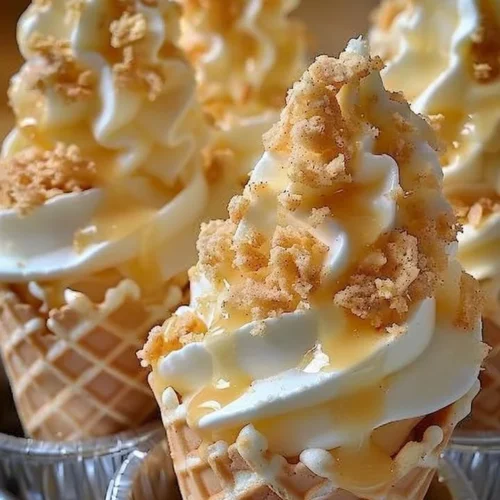
Banana Pudding Cheesecake Cones
Ingredients
For the cheesecake filling
- 1 block 8 oz cream cheese, softened This will serve as the rich, creamy base of your cheesecake.
- 1/2 cup sweetened condensed milk Adds a luscious sweetness that complements the cheesiness.
- 1 box 3.4 oz instant banana cream pudding mix Brings in pure banana flavor without hassle.
- 1 1/2 cups cold milk To achieve that perfect creamy consistency.
- 1 tsp vanilla extract For an aroma that elevates the flavor profile.
- 1 cup whipped topping (like Cool Whip) For a light and fluffy finish.
For assembly
- 6 pieces waffle cones Crispy and strong enough to hold all the delicious filling.
- 1/2 cup crushed vanilla wafers Provides a delightful crunch contrasting the creamy filling.
- 1 large banana, sliced Fresh and sweet, adding a bright burst to each bite.
- extra n/a whipped topping & wafers for garnish To make your presentation pop!
Instructions
Preparation
- In a large bowl, beat the softened cream cheese until smooth and creamy.
- Add in the sweetened condensed milk, banana pudding mix, cold milk, and vanilla extract. Whip until thick and fully combined.
- Gently fold in the whipped topping to lighten the mixture.
Assembly
- Layer crushed vanilla wafers at the bottom of each waffle cone.
- Spoon in a generous portion of the cheesecake filling, then add a slice or two of banana. Repeat layers until the cones are full.
- Top each cone with extra whipped topping and sprinkle with more crushed wafers. Garnish with a banana slice or wafer.
- Chill your cones upright for at least 30 minutes before serving to help set the filling.