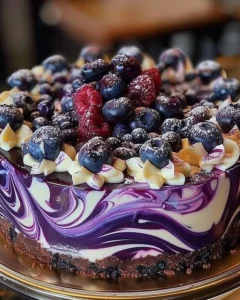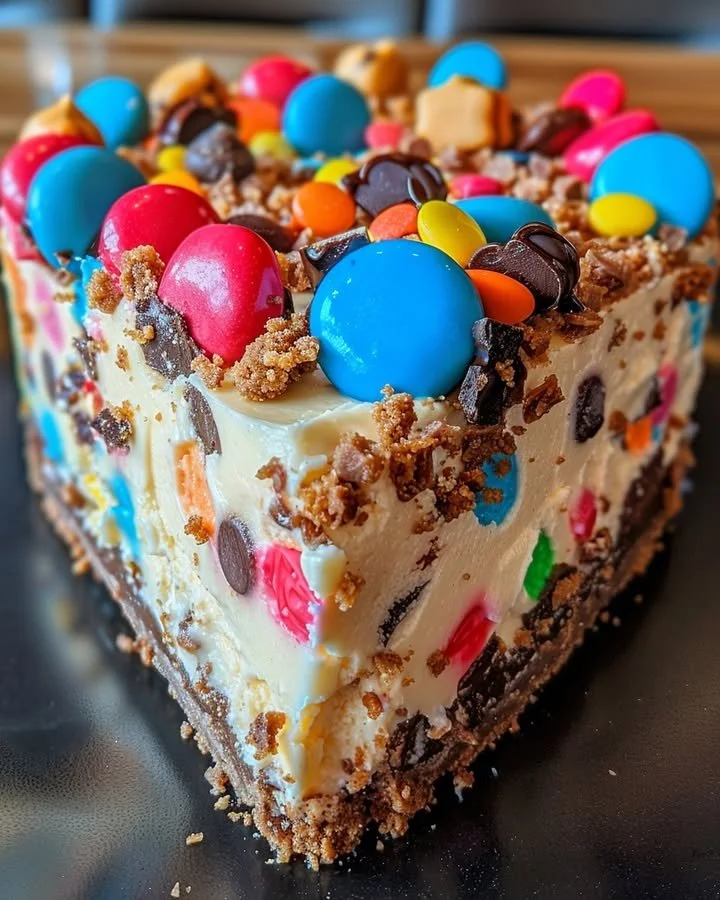
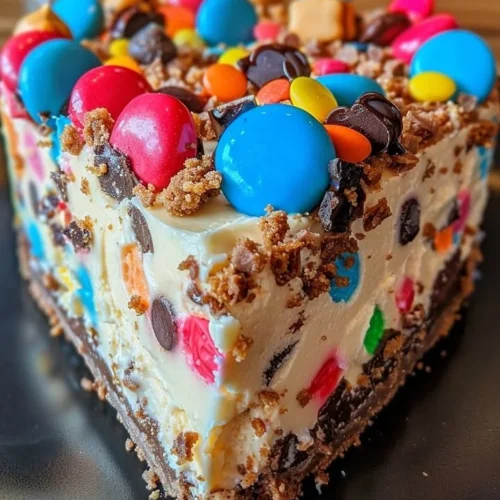
No-Bake Monster Cookie Dough Cheesecake
There’s something tantalizing about No-Bake Monster Cookie Dough Cheesecake. The moment you lay eyes on it, you’re greeted by the rich hues of chocolate, the vibrant glimmers of colorful M&M’s, and a glossy drizzle of chocolate syrup beckoning you to dive in. This dessert melds the sweet nostalgia of cookie dough with the creamy decadence of cheesecake, making it a stunning centerpiece that’ll leave your guests in awe. In this recipe, we’ll guide you through a step-by-step process that will help you create this irresistible treat in your very own kitchen. Get ready to embark on a culinary adventure that not only delights the senses but warms the heart!
History / Fun Fact
The Monster Cookie originated in the kitchens of the Midwest in the USA. Created in the 1970s, it featured a delightful fusion of oats, chocolate chips, and candy, reflecting the creativity and joyful spirit of home bakers eager to experiment. This cookie has evolved over time, forming endless variants, and has now inspired this decadent No-Bake Monster Cookie Dough Cheesecake! An iconic treat has transformed from a simple cookie to a layered masterpiece that embodies fun, nostalgia, and communal joy—a sweet reminder of life’s simple pleasures.
Ingredients
Let’s gather our luscious ingredients for this delightful No-Bake Monster Cookie Dough Cheesecake. Firstly, we’ll need ½ cup of unsalted butter, softened to creamy perfection, along with ½ cup of dark brown sugar that brings a warm, caramel-like aroma. Add to this ¼ cup of granulated sugar for just the right amount of sweetness, and a whisper of vanilla extract to round it out.
Next, the star of our cookie dough filling: 1 cup of all-purpose flour—make sure it is heat-treated for safety, giving it a tender texture without worry. A sprinkle of salt and ½ cup of mini chocolate chips will ensure each bite is a chocolatey delight, complemented by ½ cup of colorful M&M’s, adding both nostalgia and a crunch.
For our cheesecake layer, grab 16 oz of creamy cream cheese, softened and ready to blend, along with 1 cup of powdered sugar to create that luscious sweetness. Another teaspoon of vanilla extract will elevate the flavors, while 1 cup of heavy whipping cream will introduce a light and airy texture.
To make it even more delightful, we’ll finish with extra mini chocolate chips, more M&M’s, and a drizzle of rich chocolate syrup to crown our masterpiece.
Cooking Time & Tips For No-Bake Monster Cookie Dough Cheesecake
Preparing this No-Bake Monster Cookie Dough Cheesecake can be as quick or leisurely as you wish. It typically takes around 25-30 minutes to prepare, but let’s not forget the required chill time, which is at least 4 hours—though overnight is even better! Quick preparation may leave you with some residual warmth from excitement, while a slower approach allows all the flavors to blend seamlessly.
For the best results, make sure your cream cheese is at room temperature to ensure a smooth mixture devoid of lumps. Ensure your heavy cream achieves stiff peaks during whipping; this is essential for a fluffy cheesecake layer that beautifully lightens up the rich flavors. Also, don’t rush the chilling process; allowing it to set perfectly ensures clean slices and optimal flavor intensity.
Step-by-Step Directions
Make the Cookie Dough Layer: In a cozy mixing bowl, cream together the softened butter, brown sugar, granulated sugar, and vanilla extract until smooth and fluffy. The mixture should be airy, fragrant, and inviting. Next, fold in the heat-treated flour and salt until well blended—this dough should feel just like the comforting cookie dough you loved as a child. Toss in the mini chocolate chips and M&M’s, giving your mixture the signature crunch. Set aside to embrace its flavor.
Prepare the Cheesecake Filling: In a large mixing bowl, take your softened cream cheese and beat it with an electric mixer until it’s beautifully smooth and creamy. Sprinkle in the powdered sugar and a splash of vanilla extract, mixing until fully incorporated. In a separate bowl, whip the heavy cream, allowing it to transform into stiff peaks—a magical moment where it becomes fluffy and light. Gently fold the whipped cream into your cream cheese mixture, creating a dreamy, airy cheesecake filling.
Assemble the Cheesecake: Now for the fun part! In a 9-inch springform pan, press half of your cookie dough mixture into the bottom, crafting an even and slightly firm layer. Spread half of the cheesecake filling on top, coaxing it delicately to ensure it reaches the edges. Add spoonfuls of the remaining cookie dough over the filling—don’t worry about making it perfect; the rustic look is part of its charm! Finally, top with the rest of the cheesecake filling, smoothing the top with a spatula, eager to impress your onlookers.
Chill: Place your assembled cheesecake in the refrigerator for at least 4 hours, although overnight will reward you with flavors that meld beautifully as the cheesecake sets into a creamy delight that’s worthy of any occasion.
Decorate and Serve: Once your cheesecake is gloriously set, carefully remove it from the springform pan, revealing your creation. Top it with an abundance of mini chocolate chips and M&M’s, treating your eyes to a vibrant display before drizzling with rich chocolate syrup—a final touch that adds elegance and allure.
Slice and Enjoy: Finally, take a sharp knife, slice through the layers of creamy mousse and sweet dough, and prepare to serve this unforgettable No-Bake Monster Cookie Dough Cheesecake. Each bite is a blissful fusion of chewy, creamy goodness that promises to transport you straight to dessert heaven.
Serving Suggestions & Occasions
This No-Bake Monster Cookie Dough Cheesecake is perfect for any occasion, from casual family dinners to celebratory gatherings with friends. Imagine slicing into this indulgent dessert at a birthday party, picnic, or holiday feast—the reactions will be worth every effort! It pairs beautifully with a scoop of vanilla ice cream or a dollop of whipped cream for added decadence. For a touch of flair, serve with fresh strawberries or raspberries, their tartness balancing the richness of the cheesecake and elevating the entire experience.
Common Mistakes For No-Bake Monster Cookie Dough Cheesecake
Beware of a few common pitfalls when creating this masterpiece! Overmixing the cream cheese can lead to a dense filling; aim for a silky smooth texture instead. When whipping the heavy cream, be cautious not to overwhip; this can cause it to separate and ruin the airy consistency we’re after. Additionally, always allow the cheesecake ample time to chill; this ensures it sets properly for impressive slices. Finally, avoid skipping the heat treatment for the flour; it’s a crucial safety step that prevents any potential issues.
Healthier Alternatives & Variations
While indulgence is the theme here, there are ways to lighten this No-Bake Monster Cookie Dough Cheesecake without sacrificing flavor. Consider using low-fat cream cheese or even Greek yogurt in place of cream cheese for a healthier option. You can swap out the sugars with a natural sweetener like stevia or maple syrup.
For a gluten-free variation, try certified gluten-free oats and gluten-free cookie mixes to create your cookie dough layer. As for the toppings, experimenting with different kinds of candy or omit them entirely for a simpler, elegant look can be a delightful twist.
FAQs
Can I use different candies instead of M&M’s?
Absolutely! Feel free to use any candy varieties you love or have on hand.How long will the cheesecake keep in the fridge?
This cheesecake can last for up to five days when stored properly in an airtight container in the refrigerator.Can I make this recipe ahead of time?
Definitely! It’s perfect to prepare the night before, allowing it plenty of time to set.What if I can’t find heat-treated flour?
You can heat treat the flour yourself by spreading it on a baking sheet and placing it in a preheated oven at 350°F (175°C) for 5-10 minutes.Can I freeze this cheesecake?
Yes, you can freeze it! Just ensure it’s well-wrapped, and it will last for up to three months.Is there a dairy-free alternative for this recipe?
Yes! You can use dairy-free cream cheese and coconut whipping cream for a dairy-free cheesecake version.
Conclusion
This No-Bake Monster Cookie Dough Cheesecake is a dream brought to life—a sweet escape filled with moments of joy and satisfaction. Its layers of chewy cookie dough and creamy cheesecake invite you to experience a symphony of flavors that will captivate your senses. Don’t wait—this recipe is the answer to your dessert cravings, begging for you to indulge. Gather your ingredients and dive into the delightful process of making this stunning cheesecake that will have everyone asking for seconds. Enjoy making memories in your kitchen with this unforgettable treat!
No-Bake Monster Cookie Dough Cheesecake
Ingredients
Cookie Dough Layer
- 0.5 cup Unsalted butter, softened Make sure it’s creamy
- 0.5 cup Dark brown sugar For a warm, caramel-like flavor
- 0.25 cup Granulated sugar For sweetness
- 1 teaspoon Vanilla extract Adds flavor
- 1 cup All-purpose flour (heat-treated) Ensure it’s heat-treated for safety
- 1 pinch Salt
- 0.5 cup Mini chocolate chips For chocolatey bites
- 0.5 cup Colorful M&Ms Add crunch and nostalgia
Cheesecake Filling
- 16 oz Cream cheese, softened At room temperature
- 1 cup Powdered sugar For sweetness
- 1 teaspoon Vanilla extract
- 1 cup Heavy whipping cream To create a fluffy texture
Toppings
- 0.5 cup Mini chocolate chips For garnish
- 0.5 cup Colorful M&Ms For garnish
- to taste Chocolate syrup For drizzling
Instructions
Make the Cookie Dough Layer
- In a mixing bowl, cream together the softened butter, brown sugar, granulated sugar, and vanilla extract until smooth and fluffy.
- Fold in the heat-treated flour and salt until well blended.
- Add mini chocolate chips and M&Ms, mixing until evenly distributed.
Prepare the Cheesecake Filling
- In a large bowl, beat the softened cream cheese until smooth.
- Add powdered sugar and vanilla extract, mixing until fully incorporated.
- In another bowl, whip the heavy cream to stiff peaks.
- Gently fold the whipped cream into the cream cheese mixture.
Assemble the Cheesecake
- In a 9-inch springform pan, press half of the cookie dough mixture into the bottom.
- Spread half of the cheesecake filling on top.
- Add spoonfuls of the remaining cookie dough over the filling.
- Top with the remaining cheesecake filling, smoothing the top.
Chill
- Refrigerate for at least 4 hours or overnight for best flavor.
Decorate and Serve
- Remove the cheesecake from the pan, garnishing with mini chocolate chips and M&Ms.
- Drizzle with chocolate syrup before serving.
Slice and Enjoy
- Slice the cheesecake with a sharp knife and serve.